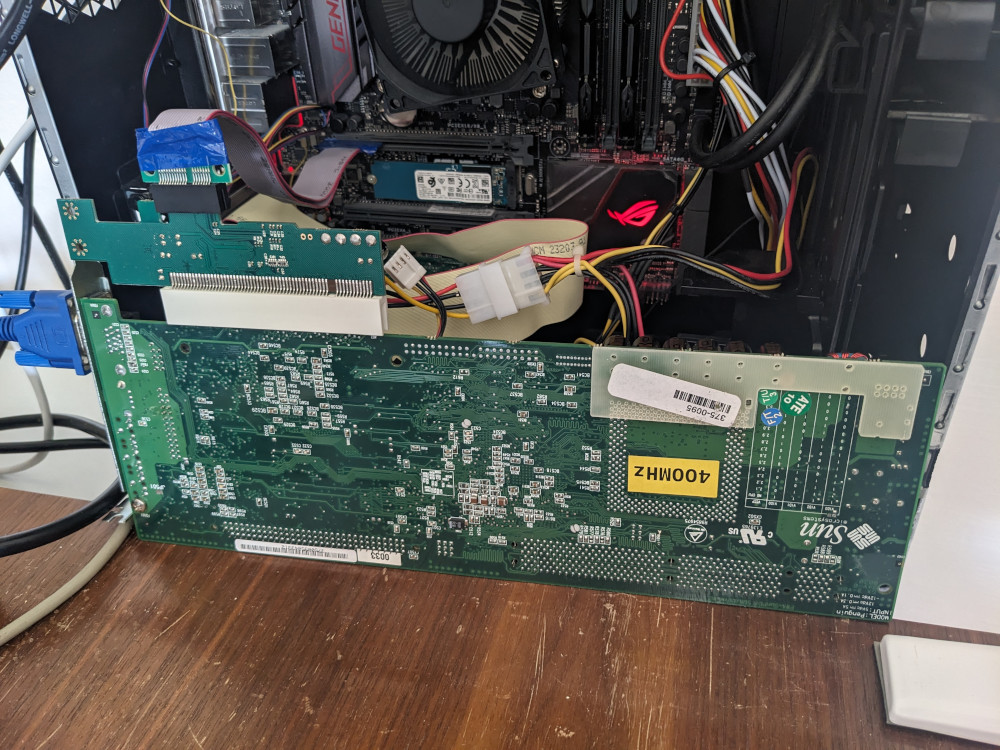
The SunPCi
In here the main idea was to get the board to boot and interface with Linux as a host system and to get an understanding of the inner workings. DOS was used as the target operating system. The board was used with a PCIe to PCI adapter and PCIe extension cable without issues.
Status of this software is highly experimental.
Getting this SBC to do anything is not as simple as applying power. For once, the board does not contain any hardware disk interfaces, so the boot medium has to be provided by the host. To get the board to boot at all, the driver has to set up the mapped memory, write some config memory, enable bus mastering and give the command for boot. There are multiple modes into which the board can boot, some may be used for updating the firmware. The SBC has a modified Award bios. In general it works like a regular bios, so it is possible to configure periphery and boot devices just like on a normal PC.
Video output is done either through a VGA connector on the SBC or it can be directly displayed on the workstation in a window. Doing that, the experience would supposedly be like running a virtual machine.
In practice the redirecting is limited, mainly because of the very low-level interface that the board has to the host. There is no framebuffer provided, with the rendering being done only on the graphcis card. Instead the host
application has to make sense of the raw video memory and graphics card registers to display anything. Since this is a massive task due to the various supported graphics modes and limited by the workstation interpreting and rendering it,
there is clear specialization for running business software under a Windows environment. Especially games will not render correctly if they use any more esoteric techniques for speed and effects.
Fortunately the external VGA connector does not suffer from this and the images from it is directly generated by the on-board graphics card. Due to the difficulty and lack of use unless done near perfectly I did not persue rendering of the graphics output and only used the VGA output. Maybe it would be possible to hook a software into this
that is already good at emulating a VGA card, e.g. DOSBox.
As for input, keyboard and mouse are shared between the host and the guest. The interface is again very low-level. Keyboard make and break codes are directly sent through the IOCTL interface of the driver for the keyboard. For mouse support, the system
always has a virtual "Microsoft" serial mouse connected to COM2. The mouse data from the host is directly packed into the three byte structure of the data packet that a real serial mouse would produce. Because of how this is implemented, in theory any kind of serial mouse data could be passed to the board.
For example in this implementation support was added for the middle mouse button by the Logitech mouse extension. This
In the original software, two hard disks for drives C and D are realised with disk images. The floppy and the CD drive of the host system is passed through to the SBC directly. For the CD drive this requires a special driver. In this version, only floppy and hard disk are implemented, both using disk images for convenience. Reading and writing to the disks is done through read/write operations on the character device exposed by the driver. Hard disk images use a proprietary format that simply prepends a 1024 byte header to a raw disk image. The header contains information about the virtual hard disk geometry for CHS addressing. When creating a disk image on the original software, it is made bootable with Caldera OpenDOS and some Sun utilities for sharing folders is preinstalled.
The "driver" subfolder of the downloadable source contains the kernel driver. It can be built against Linux kernel 7.0. Loading the driver is done with sudo insmod ./penguin.ko. For unloading use sudo rmmod penguin. The driver interface can be made accessible without root privileges via a udev rule. For Debian based systems use sudo cp ./99-penguin.rules /etc/udev/rules.d/.
In the "application" there is the user mode application and some helper scripts. The application requires SDL2. First load the driver, then start the application. By default, it will reboot the SBC. To avoid that, use the --attach command line option. To create empty disk images, use the createdisk.py script. First parameter gives the drive letter (either "C" or "D"), second parameter is the size in MiB. So to create a C drive with 2000 MiB, use ./createdisk.py C 2000. Note that the image is completely empty, so it has to be paritioned and formatted after booting from a floppy. After this, the partition can be easily mounted in Linux with losetup -Pf ./C.diskimage -o 0x400. For the emulated floppy, raw images of 1.44 MB disks must be used. The file floppy_boot.img will be automatically inserted when starting the application. Any number of floppy images named floppy_?.img with ? standing for a number starting with 1 can be placed in the application directory. Pressing Win+F1 cycles through the images. Win+F5 performs a reboot.
Click on a picture for a larger version.
Source code for driver and PC interface
penguin_driver_v0.1.zip (14 KiB)
Please send questions and comments to computing@jjs.at.
 is a single board computer (SBC) from Sun that can be used to add x86 capabilities to Sun workstations based on the Sparc architecture and running the Unix flavour Solaris.
There were several versions of the board released, this is about the first revision (codenamed Penguin) based on a 400 MHz AMD K6-2 CPU. The board has all
hardware interfaces that you would expect from a single board computer of the era. That is except for a floppy and an IDE harddisk interface. There
is an unpopulated header for IDE, but the main idea behind this is that disks are provided by the host system. For harddisks that would be disk images while the floppy and the CD drive would be passed through.
has a good overview of mouse protocols.
is a single board computer (SBC) from Sun that can be used to add x86 capabilities to Sun workstations based on the Sparc architecture and running the Unix flavour Solaris.
There were several versions of the board released, this is about the first revision (codenamed Penguin) based on a 400 MHz AMD K6-2 CPU. The board has all
hardware interfaces that you would expect from a single board computer of the era. That is except for a floppy and an IDE harddisk interface. There
is an unpopulated header for IDE, but the main idea behind this is that disks are provided by the host system. For harddisks that would be disk images while the floppy and the CD drive would be passed through.
has a good overview of mouse protocols.